
Cutting Machine Silhouette Curio 2: Skillnad mellan sidversioner
Arru (diskussion | bidrag) (varning) |
Arru (diskussion | bidrag) Ingen redigeringssammanfattning |
||
| (50 mellanliggande sidversioner av 3 användare visas inte) | |||
| Rad 1: | Rad 1: | ||
Curio 2 | {| style="clear: right; float: right; width: 20em; padding: 0.3em; margin: 0.5em 0 0.5em 1em; border: 1px solid #A3B1BF; background: #f5faff; text-align: left; font-size: 100%; line-height: 1.5em;" | ||
|- | |||
| align="center" |'''Silhouette Curio 2 info''' | |||
|- | |||
|[[Fil:Silhouette Curio 2.jpg|alt=Silhouette Curio 2|center|200x200px]] | |||
|- | |||
| style="padding:0.1em; font-size:1.0em; background-color:#dfeff2" |'''Usage:''' free for all | |||
|- | |||
| style="padding:0.1em; font-size:1.0em; background-color:#dfeff2" |'''Model:''' Silhouette Curio 2 | |||
|- | |||
| style="padding:0.1em; font-size:1.0em; background-color:#dfeff2" |'''Work surface:''' 12x12" | |||
|- | |||
| style="padding:0.1em; font-size:1.0em; background-color:#dfeff2" |'''Clearance:''' 20 mm max thickness | |||
|- | |||
| style="padding:0.1em; font-size:1.0em; background-color:#dfeff2" |'''Booking:''' First come, first serve | |||
|- | |||
| style="padding:0.1em; font-size:1.0em; background-color:#dfeff2" |'''Cost:''' None (but vinyl by the dm is purchased in web store) | |||
|- | |||
| style="padding:0.1em; font-size:1.0em; background-color:#dfeff2" |'''Logging:''' None | |||
|- | |||
| style="padding:0.1em; font-size:1.0em; background-color:#dfeff2" |'''Location:''' Big Room | |||
|} | |||
The Silhouette Curio 2 is a precision flatbed cutting machine featuring an electrostatic bed for cutting without a mat, 20mm vertical clearance for thicker materials, and two tool holders. It offers automatic tool detection and material thickness measurement. Supports projects including cutting, engraving, pen plotting, foil heat transfer and embossing. | |||
This cutter is a great all-round choice and easy to load/unload as long as the material is ≤ 12" (30 cm) on both axes. If you need a larger work surface, loading vinyl straight from a roll, or just in a hurry (it's roughly twice as fast), the [[Cutting Machine Silhouette Cameo Pro MK-II|Cameo Pro MK-II]] is for you. | |||
== | == Setups & settings == | ||
TODO: add name of Silhouette presets for these tasks | |||
{| class="wikitable" | |||
|+ | |||
!What to make | |||
!Material | |||
!Tool | |||
!Support | |||
|- | |||
|Vinyl sticker/fabric transfer | |||
|Vinyl | |||
|Fixed or AutoBlade | |||
|Debris tray with taped-on Cameo mat | |||
|- | |||
|Printed stickers | |||
|Sticker paper | |||
|AutoBlade or Kraft blade (see instructions below) | |||
|Debris tray with taped-on Cameo mat | |||
|- | |||
|Shape-cut card | |||
|Card stock | |||
|Kraft blade (orange) | |||
|Debris tray with taped-on Cameo mat | |||
|- | |||
|Cut fabric | |||
|Fabric | |||
|Rotary blade (gray) | |||
|Debris tray with taped-on Cameo mat | |||
|- | |||
|Embossed card | |||
|Card stock | |||
|Embossing tool (narrow/wide) | |||
|Debris tray with taped-on soft embossing mat | |||
|- | |||
|Foil on paper | |||
|Paper & card stock | |||
|Heat foil tool 0.5-2.5 | |||
|Cameo mat or electrostatic tray | |||
|- | |||
|Foil on leather | |||
|Leather | |||
|Heat foil tool 0.5-2.5 | |||
|Debris tray, taped-on directly or on Came mat | |||
|- | |||
|Foil on acrylic | |||
|Acrylic (and other hard, smooth plastics) | |||
|Heat foil tool 2.5 | |||
|Debris tray with material taped down | |||
|- | |||
|Paper plotting | |||
|Paper | |||
|Cameo pen/adapter | |||
|Electrostatic tray | |||
|- | |||
|Surface plotting | |||
|Acrylic, metal, wood etc. | |||
|Marker in pen adapter | |||
|Debris tray with material taped down | |||
|- | |||
|Engraving | |||
|Acrylic, wood, aluminium, copper | |||
|Power engraver | |||
|Debris tray with material taped down | |||
|} | |||
# | == Cutting instructions == | ||
# | {| | ||
# | |- style="color: black; background: #fae796; border: 1px solid #cbaa1a; padding: 10px; display: block;" | ||
# | |'''Important:''' The electrostatic cutting table '''must always be used with the protective plastic sheet on top'''. Failing to do this will cause permanent damage to the electrostatic grabbing surface. | ||
# | |} | ||
## | === Starting the Machine === | ||
## | Power on the machine by pressing and holding the power button on the right side. | ||
# | |||
# | === Preparing the cutting Table === | ||
# | |||
# | # Make sure the debris tray (all plastic, raised edges) is mounted in the machine | ||
# | # To change it, flip the release levers on both sides, pull the table straight out towards you. About halfway out, it can be lifted free. | ||
# | # Insert the debris tray the same way, flip levers to lock it into the machine | ||
# | # If you need a Cameo mat, place it within the matching raised markings on the tray, use sticky tape to hold it in place | ||
# | |||
# | === Preparing the material === | ||
# | # Place the material you want to cut on the table. | ||
# | # The material must be completely flat in order to adhere well electrostatically. | ||
# | # You can also place a regular Cameo mat on top instead. | ||
# Wait for around a minute for the electric charge to grab the material properly. | |||
# Try moving the material with all fingertips on one hand. If it resists movement, the hold is strong enough to cut. | |||
# If the material does not adhere well, switch to the “debris” plate (made entirely of plastic with raised edges) and tape a Cameo mat onto it. | |||
=== Tool selection === | |||
# To change tools: pull forward on tool holder's protruding tab, lift the tool upward. Iinsert the new tool using the same procedure in reverse. | |||
# The completely white cutting tool is “auto depth” one, suitable for cutting when you are unsure of the exact settings. | |||
=== Software preparation === | |||
# Start ''Silhouette Studio'' on the computer next to the cutting machines. | |||
# Select Curio 2 in the top right white box. It should say "ready" in green letters, if not, check that it's | |||
## Turned on | |||
## Connected via USB | |||
# Open your design and adjust its size and placement. | |||
# If using the Cameo grid mat for precise placement, select ''Cameo Mat'' from the options on the right side of the window, and adjust the transparency slider so you can see lines and numbers. | |||
=== Cutting === | |||
# Click the '''SEND''' tab. | |||
# Select the tool(s) you inserted and the material you are using. | |||
# Adjust the force and cutting depth settings. | |||
# For textile transfers, stencils, and use cases, choose '''Mirror''' (unless you have already mirrored your design, earlier in the process). | |||
# Click '''Send'''. | |||
# Your design will now be cut / drawn / engraved | |||
=== Pausing/emergency stop === | |||
* Press the ⏸️ button in the control panel (only lit while cutting) | |||
* To cancel cutting completely: | |||
*# Long press the ⏸️ button again for ≈ 10 seconds, the sled will return to the rear left starting position | |||
*# Find the cut job listed next to the Send button in Silhouette studio. Press close ╳ next to the cut job. | |||
* To resume, press ⏸️ button again | |||
=== Cutting prints with registration marks === | |||
Using this technique and suitable sticker paper you can make professional-looking cut-out stickers by perfectly matching cut-outs with a printed design. There are also other uses, like business- or playing cards, signs etc. | |||
This is a feature of the Curio 2 cutter, so it cannot be done on Cameo Pro. | |||
# Launch Silhouette studio, select Edit -> Registration marks to bring up the registration marks settings | |||
# Enable registration marks | |||
# Prepare your design. It must fit within the red outlined rectangle, the cutter will refuse to cut outside of it. The design also can't obscure any of the registration marks. | |||
# For bitmap images that you want contour-cut (not just the enclosing rectangle), make sure that you have a path corresponding to the cut-out contour in your document. | |||
# In the send tab in Silhouette studio, select/deselect and confirm that your cutting outlines match what you want your sticker outlines to look like | |||
# In Silhouette studio's design tab, make sure any paths that are only used for cutting outlines have no fill- or outline color set, otherwise they will end up in the print. WYSIWYG. | |||
# Load your sticker paper into the printer. | |||
# In the registration marks palette window, click Print. It is '''important to print the design from here''', or the metrics may not line up in later steps. Follow thru the steps to start printing, selecting paper type and tray as needed. | |||
# Place the printout on the sticky Cameo cutting mat. | |||
# Cut as usual. As long as there are registration marks in the document, the cutter will look for those on the printout and line up perfectly. For stickers that stay together on the sheet, you can try AutoBlade with force 15, blade depth 3. For separate stickers cut all the way through, you will need to use the kraft blade with settings according to the thickness of your sticker paper sheet. | |||
== Heat foil instructions == | |||
The Curio can be used to apply shiny metallic designs to a variety of surfaces including paper, cardboard, leather and various plastics. | |||
Instructions below are for applying heat foil to an acrylic/plexiglas piece whose outer shape is laser cut. Some steps can be left out, or differ slightly when using other materials. | |||
Video overview: https://www.youtube.com/watch?v=uXTAYRAT-X0 | |||
=== Acrylic cutting === | |||
# Set up Lightburn with the contour of your design | |||
# Add a second outer cut like a ”box” to use as a jig in the foil step (''if your final piece is significantly larger than the foil, you can omit this part'') | |||
# Cut both these shapes in the laser | |||
# Remove protective foil from acrylic (if any), both top and bottom | |||
# Take both pieces over to the Curio | |||
=== Pen warm-up === | |||
Heat pen will take 5-10 minutes to warm up. Starting the warm-up first thing, it'll be ready for use by the time you've finished the rest of the preparations. | |||
# open your design in Silhouette software | |||
# go to send tab | |||
# choose ”acrylic, foil” material preset | |||
# Insert 2,5mm heat pen into slot 2 | |||
# Start pen heating by clicking thermometer button in the silhouette Send tab | |||
=== Positioning in Curio cutter === | |||
[[Fil:Rigging for thickness detection.jpg|miniatyr|Foil application setup for acrylic, ready to start, with an extra piece at 0,0 position to guide the thickness detector.]] | |||
For materials other than acrylic, pick heat pen size corresponding to the desired line width. For acrylic and similar rigid materials, the result will be significantly thinner than the indicated size and so the '''2,5mm pen is recommended'''. | |||
# mount the debris tray and a sticky cameo mat on top (instructions above) | |||
# put down the piece in a suitable place on the cameo mat | |||
# put down the jig (box) around the piece on the Curio | |||
# set up for thickness detection success: | |||
#* put a small piece of non-transparent acrylic ''of same thickness'' at the 0,0 point on the mat | |||
#* this gives the automatic thickness detection something to work with | |||
#* avoid having reflective foil at the 0,0 point since it confuses the thickness detector. | |||
# rub and press to make the piece and the box stick well to the surface. | |||
# If it does not feel completely fixed, use some masking tape to hold it in place, avoiding the parts that are going to have foil applied to them | |||
=== Software set-up === | |||
{| class="wikitable", style="clear: right; float: right; width: 20em; padding: 0.3em" | |||
|+ | |||
!Foil setting | |||
!Acrylic | |||
|- | |||
|Speed | |||
|4 | |||
|- | |||
|Pressure | |||
|12 | |||
|- | |||
|Line raster (2,5 mm pen / 100% fill) | |||
|0,2mm | |||
|} | |||
# open your design in Silhouette software | |||
# make sure pen heating is on per instructions above | |||
# choose ”cut by color” mode | |||
# Go to Design tab | |||
# select '''Cameo mat''' in the silhouette software (important, otherwise the registration lines won’t line up) | |||
# line up your design with the cut piece on the mat | |||
# make sure only the parts you want to apply foil to are selected for tool 2, everything else (laser shape etc.) deselected | |||
# If you want to have some areas filled rather than contour drawn: | |||
## Select the part to be filled | |||
## Choose special tools, heat pen fill, and enable the fill style of your choice | |||
## For a 100% fill, use hatch (lines) fill style with setting from the table | |||
=== Mounting foil === | |||
# wipe the acrylic surface with isopropyl alcohol so that it is squeaky clean | |||
# measure a suitable length of heat transfer foil to cover the areas with the design. Make room on the sides of the actual design for attaching tape, foil transfer does not work well with tape on top | |||
# find the best pair of scissors on hand – the foil is very delicate | |||
# cut the foil to length | |||
# roll foil onto piece + jig, use squegee (among the cutter tools on the wall) to wipe the foil all flush against the surface | |||
# apply masking tape at the edges, gently pulling to get the foil flat against the surface | |||
=== Foil transfer === | |||
# Double check that the pen has finished heating up (thermometer on button is all red, not animating) | |||
# press "Send" to start foil transfer | |||
# pay attention to whether the pen hits the surface and the thickness was correctly detected. If not, try again making sure you are using the trick with a "reference piece" of opaque acrylic at the 0,0 point, see above | |||
# peel away foil and inspect results. If not satisfactory, you can change settings and apply new foil as long as you do not move the jig in the meantime. | |||
# remember to '''remove the heat pen''' (or turn it off in software) so that it won't sit heated in the machine for hours on end. | |||
== Pen plotting instructions == | |||
<youtube>x1nqNn4G7qA</youtube> | |||
Pen plotting can create stunning designs using materials and inks not available with ordinary printers. The Silhouette system allows special plotting pens in a variety of colors, as well as attaching your own pens provided they fit in one of the available pen holders. | |||
# Choose material: | |||
## For copy paper and other thin papers, use the electrostatic mat (with protective sheet, but no additional mat on top) | |||
## For thicker materials that might not adhere properly to the electrostatic mat: use a Cameo mat with suitable adhesion strength taped onto the debris (non-electrostatic) tray | |||
# Choose pen: | |||
#* Silhouette pen: | |||
#*# [[Fil:Silhouette standard Pen holder assembly.jpg|ingen|miniatyr|150x150px|Insert pen into holder]][[Fil:Pen holder mounted.jpg|ingen|miniatyr|200x200px|Mount pen holder to cutter just like a blade tool]] | |||
#* Custom pen ("C" adapter) | |||
#*# Try out the 3 colored adapter rings to see which one fits your pen the most snugly[[Fil:Silhouette pen adapter parts.jpg|ingen|miniatyr|200x200px|Inserting the pen into adapter ring of suitable size]] | |||
#*# Insert pen into the white bottom part and screw the adapter into it | |||
#*# The pen tip must reach out of the bottom hole at just the correct distance. | |||
#*## Push the pen as far as it will go out of the white holder | |||
#*## Attach the transparent pen holder cap, pushing the pen back in until the cap is fully in place | |||
#*## Check that the pen tip sits centered in the cap[[Fil:Silhouette pen adapter parts (assembled).jpg|ingen|miniatyr|200x200px|Pen adapter assembled, note the transparent cap, pen tip should be just touching it.]] | |||
#*# Screw on the white top adapter ring, gentle fingers as it is prone to breaking | |||
#*# Check that there is no play (wiggle) in the pen | |||
#*# Mount pen assembly in tool position 2, just like a cutting tool[[Fil:Pen adapter fitted to Curio 2.png|ingen|miniatyr|267x267px|Adapter with pen fitted to Curio tool holder #2]] | |||
#*# ''TODO: list of known pen types that fit one of the adapters'' | |||
# Perform the same steps in Silhouette studio as for cutting, selecting "Pen holder", suitable material, and "Sketch" instead of Cut. | |||
#To plot in '''multiple colors''', use the "Cut line by color" feature to only plot lines having the currently mounted pen color. Then switch pen color, change the setting accordingly, and plot again.[[Fil:Selecting tool actions.jpg|ingen|miniatyr|200x200px|In the send panel, tool action can be determined by color]] | |||
== Accessories == | |||
* Cutting mats with registration grid | |||
* Heat pen | |||
* Power engraver | |||
* Leather punch | |||
* Embossing tool | |||
* Gel pens | |||
* Pen Holder (for regular pens) | |||
[[Kategori:Stora Rummet]] | |||
[[Kategori:Stora rummet]] | |||
Nuvarande version från 11 juni 2026 kl. 08.51
| Silhouette Curio 2 info |
 |
| Usage: free for all |
| Model: Silhouette Curio 2 |
| Work surface: 12x12" |
| Clearance: 20 mm max thickness |
| Booking: First come, first serve |
| Cost: None (but vinyl by the dm is purchased in web store) |
| Logging: None |
| Location: Big Room |
The Silhouette Curio 2 is a precision flatbed cutting machine featuring an electrostatic bed for cutting without a mat, 20mm vertical clearance for thicker materials, and two tool holders. It offers automatic tool detection and material thickness measurement. Supports projects including cutting, engraving, pen plotting, foil heat transfer and embossing.
This cutter is a great all-round choice and easy to load/unload as long as the material is ≤ 12" (30 cm) on both axes. If you need a larger work surface, loading vinyl straight from a roll, or just in a hurry (it's roughly twice as fast), the Cameo Pro MK-II is for you.
Setups & settings
TODO: add name of Silhouette presets for these tasks
| What to make | Material | Tool | Support |
|---|---|---|---|
| Vinyl sticker/fabric transfer | Vinyl | Fixed or AutoBlade | Debris tray with taped-on Cameo mat |
| Printed stickers | Sticker paper | AutoBlade or Kraft blade (see instructions below) | Debris tray with taped-on Cameo mat |
| Shape-cut card | Card stock | Kraft blade (orange) | Debris tray with taped-on Cameo mat |
| Cut fabric | Fabric | Rotary blade (gray) | Debris tray with taped-on Cameo mat |
| Embossed card | Card stock | Embossing tool (narrow/wide) | Debris tray with taped-on soft embossing mat |
| Foil on paper | Paper & card stock | Heat foil tool 0.5-2.5 | Cameo mat or electrostatic tray |
| Foil on leather | Leather | Heat foil tool 0.5-2.5 | Debris tray, taped-on directly or on Came mat |
| Foil on acrylic | Acrylic (and other hard, smooth plastics) | Heat foil tool 2.5 | Debris tray with material taped down |
| Paper plotting | Paper | Cameo pen/adapter | Electrostatic tray |
| Surface plotting | Acrylic, metal, wood etc. | Marker in pen adapter | Debris tray with material taped down |
| Engraving | Acrylic, wood, aluminium, copper | Power engraver | Debris tray with material taped down |
Cutting instructions
| Important: The electrostatic cutting table must always be used with the protective plastic sheet on top. Failing to do this will cause permanent damage to the electrostatic grabbing surface. |
Starting the Machine
Power on the machine by pressing and holding the power button on the right side.
Preparing the cutting Table
- Make sure the debris tray (all plastic, raised edges) is mounted in the machine
- To change it, flip the release levers on both sides, pull the table straight out towards you. About halfway out, it can be lifted free.
- Insert the debris tray the same way, flip levers to lock it into the machine
- If you need a Cameo mat, place it within the matching raised markings on the tray, use sticky tape to hold it in place
Preparing the material
- Place the material you want to cut on the table.
- The material must be completely flat in order to adhere well electrostatically.
- You can also place a regular Cameo mat on top instead.
- Wait for around a minute for the electric charge to grab the material properly.
- Try moving the material with all fingertips on one hand. If it resists movement, the hold is strong enough to cut.
- If the material does not adhere well, switch to the “debris” plate (made entirely of plastic with raised edges) and tape a Cameo mat onto it.
Tool selection
- To change tools: pull forward on tool holder's protruding tab, lift the tool upward. Iinsert the new tool using the same procedure in reverse.
- The completely white cutting tool is “auto depth” one, suitable for cutting when you are unsure of the exact settings.
Software preparation
- Start Silhouette Studio on the computer next to the cutting machines.
- Select Curio 2 in the top right white box. It should say "ready" in green letters, if not, check that it's
- Turned on
- Connected via USB
- Open your design and adjust its size and placement.
- If using the Cameo grid mat for precise placement, select Cameo Mat from the options on the right side of the window, and adjust the transparency slider so you can see lines and numbers.
Cutting
- Click the SEND tab.
- Select the tool(s) you inserted and the material you are using.
- Adjust the force and cutting depth settings.
- For textile transfers, stencils, and use cases, choose Mirror (unless you have already mirrored your design, earlier in the process).
- Click Send.
- Your design will now be cut / drawn / engraved
Pausing/emergency stop
- Press the ⏸️ button in the control panel (only lit while cutting)
- To cancel cutting completely:
- Long press the ⏸️ button again for ≈ 10 seconds, the sled will return to the rear left starting position
- Find the cut job listed next to the Send button in Silhouette studio. Press close ╳ next to the cut job.
- To resume, press ⏸️ button again
Cutting prints with registration marks
Using this technique and suitable sticker paper you can make professional-looking cut-out stickers by perfectly matching cut-outs with a printed design. There are also other uses, like business- or playing cards, signs etc.
This is a feature of the Curio 2 cutter, so it cannot be done on Cameo Pro.
- Launch Silhouette studio, select Edit -> Registration marks to bring up the registration marks settings
- Enable registration marks
- Prepare your design. It must fit within the red outlined rectangle, the cutter will refuse to cut outside of it. The design also can't obscure any of the registration marks.
- For bitmap images that you want contour-cut (not just the enclosing rectangle), make sure that you have a path corresponding to the cut-out contour in your document.
- In the send tab in Silhouette studio, select/deselect and confirm that your cutting outlines match what you want your sticker outlines to look like
- In Silhouette studio's design tab, make sure any paths that are only used for cutting outlines have no fill- or outline color set, otherwise they will end up in the print. WYSIWYG.
- Load your sticker paper into the printer.
- In the registration marks palette window, click Print. It is important to print the design from here, or the metrics may not line up in later steps. Follow thru the steps to start printing, selecting paper type and tray as needed.
- Place the printout on the sticky Cameo cutting mat.
- Cut as usual. As long as there are registration marks in the document, the cutter will look for those on the printout and line up perfectly. For stickers that stay together on the sheet, you can try AutoBlade with force 15, blade depth 3. For separate stickers cut all the way through, you will need to use the kraft blade with settings according to the thickness of your sticker paper sheet.
Heat foil instructions
The Curio can be used to apply shiny metallic designs to a variety of surfaces including paper, cardboard, leather and various plastics.
Instructions below are for applying heat foil to an acrylic/plexiglas piece whose outer shape is laser cut. Some steps can be left out, or differ slightly when using other materials.
Video overview: https://www.youtube.com/watch?v=uXTAYRAT-X0
Acrylic cutting
- Set up Lightburn with the contour of your design
- Add a second outer cut like a ”box” to use as a jig in the foil step (if your final piece is significantly larger than the foil, you can omit this part)
- Cut both these shapes in the laser
- Remove protective foil from acrylic (if any), both top and bottom
- Take both pieces over to the Curio
Pen warm-up
Heat pen will take 5-10 minutes to warm up. Starting the warm-up first thing, it'll be ready for use by the time you've finished the rest of the preparations.
- open your design in Silhouette software
- go to send tab
- choose ”acrylic, foil” material preset
- Insert 2,5mm heat pen into slot 2
- Start pen heating by clicking thermometer button in the silhouette Send tab
Positioning in Curio cutter

For materials other than acrylic, pick heat pen size corresponding to the desired line width. For acrylic and similar rigid materials, the result will be significantly thinner than the indicated size and so the 2,5mm pen is recommended.
- mount the debris tray and a sticky cameo mat on top (instructions above)
- put down the piece in a suitable place on the cameo mat
- put down the jig (box) around the piece on the Curio
- set up for thickness detection success:
- put a small piece of non-transparent acrylic of same thickness at the 0,0 point on the mat
- this gives the automatic thickness detection something to work with
- avoid having reflective foil at the 0,0 point since it confuses the thickness detector.
- rub and press to make the piece and the box stick well to the surface.
- If it does not feel completely fixed, use some masking tape to hold it in place, avoiding the parts that are going to have foil applied to them
Software set-up
| Foil setting | Acrylic |
|---|---|
| Speed | 4 |
| Pressure | 12 |
| Line raster (2,5 mm pen / 100% fill) | 0,2mm |
- open your design in Silhouette software
- make sure pen heating is on per instructions above
- choose ”cut by color” mode
- Go to Design tab
- select Cameo mat in the silhouette software (important, otherwise the registration lines won’t line up)
- line up your design with the cut piece on the mat
- make sure only the parts you want to apply foil to are selected for tool 2, everything else (laser shape etc.) deselected
- If you want to have some areas filled rather than contour drawn:
- Select the part to be filled
- Choose special tools, heat pen fill, and enable the fill style of your choice
- For a 100% fill, use hatch (lines) fill style with setting from the table
Mounting foil
- wipe the acrylic surface with isopropyl alcohol so that it is squeaky clean
- measure a suitable length of heat transfer foil to cover the areas with the design. Make room on the sides of the actual design for attaching tape, foil transfer does not work well with tape on top
- find the best pair of scissors on hand – the foil is very delicate
- cut the foil to length
- roll foil onto piece + jig, use squegee (among the cutter tools on the wall) to wipe the foil all flush against the surface
- apply masking tape at the edges, gently pulling to get the foil flat against the surface
Foil transfer
- Double check that the pen has finished heating up (thermometer on button is all red, not animating)
- press "Send" to start foil transfer
- pay attention to whether the pen hits the surface and the thickness was correctly detected. If not, try again making sure you are using the trick with a "reference piece" of opaque acrylic at the 0,0 point, see above
- peel away foil and inspect results. If not satisfactory, you can change settings and apply new foil as long as you do not move the jig in the meantime.
- remember to remove the heat pen (or turn it off in software) so that it won't sit heated in the machine for hours on end.
Pen plotting instructions
Pen plotting can create stunning designs using materials and inks not available with ordinary printers. The Silhouette system allows special plotting pens in a variety of colors, as well as attaching your own pens provided they fit in one of the available pen holders.
- Choose material:
- For copy paper and other thin papers, use the electrostatic mat (with protective sheet, but no additional mat on top)
- For thicker materials that might not adhere properly to the electrostatic mat: use a Cameo mat with suitable adhesion strength taped onto the debris (non-electrostatic) tray
- Choose pen:
- Silhouette pen:

Insert pen into holder 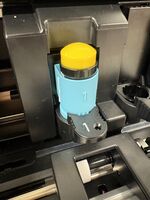
Mount pen holder to cutter just like a blade tool
- Custom pen ("C" adapter)
- Try out the 3 colored adapter rings to see which one fits your pen the most snugly
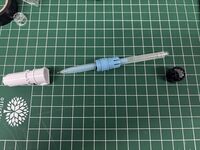
Inserting the pen into adapter ring of suitable size - Insert pen into the white bottom part and screw the adapter into it
- The pen tip must reach out of the bottom hole at just the correct distance.
- Push the pen as far as it will go out of the white holder
- Attach the transparent pen holder cap, pushing the pen back in until the cap is fully in place
- Check that the pen tip sits centered in the cap
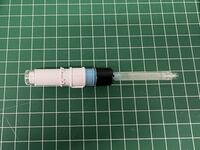
Pen adapter assembled, note the transparent cap, pen tip should be just touching it.
- Screw on the white top adapter ring, gentle fingers as it is prone to breaking
- Check that there is no play (wiggle) in the pen
- Mount pen assembly in tool position 2, just like a cutting tool
Adapter with pen fitted to Curio tool holder #2 - TODO: list of known pen types that fit one of the adapters
- Try out the 3 colored adapter rings to see which one fits your pen the most snugly
- Silhouette pen:
- Perform the same steps in Silhouette studio as for cutting, selecting "Pen holder", suitable material, and "Sketch" instead of Cut.
- To plot in multiple colors, use the "Cut line by color" feature to only plot lines having the currently mounted pen color. Then switch pen color, change the setting accordingly, and plot again.
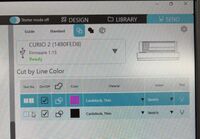
In the send panel, tool action can be determined by color


.jpg)


Accessories
- Cutting mats with registration grid
- Heat pen
- Power engraver
- Leather punch
- Embossing tool
- Gel pens
- Pen Holder (for regular pens)