Table router, Triton TRA001: Skillnad mellan sidversioner
X (diskussion | bidrag) mIngen redigeringssammanfattning |
Cloraux (diskussion | bidrag) |
||
| Rad 30: | Rad 30: | ||
Make sure to attach the dust extraction system before using the router. | Make sure to attach the dust extraction system before using the router. | ||
To raise and lower the bit, always use the big round knob on the router body. | |||
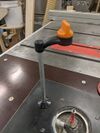
'''Use the crank above the table only for fine adjustment!''' It fits in a hole in the table, and reaches to a ball head with a nail through it on the router. | |||
[[Fil:Router crank.jpg|ramlös|133x133px]] | [[Fil:Router crank.jpg|ramlös|133x133px]] | ||
Versionen från 21 juli 2020 kl. 13.37
| Snabbfakta Triton TRA001 |
 |
| Modell: Triton TRA001 |
| Bokningsbar: Nej |
| Kostnad att använda: Gratis |
| Power: 2400W |
Generell information
Säkerhetsinformation
Handhavande av maskinen
Manual
Description on the Triton website.
Material
For wood and some plastics only.
Do not ever use metal, even as a template.
Usage instructions
Make sure to attach the dust extraction system before using the router.
To raise and lower the bit, always use the big round knob on the router body.
Use the crank above the table only for fine adjustment! It fits in a hole in the table, and reaches to a ball head with a nail through it on the router.
Replacing the bit

First, flip the switch off. Even with the machine unplugged, it’s necessary to disengage a safety mechanism. You need to push the power switch cover fully open, flip the switch and let the cover close completely.
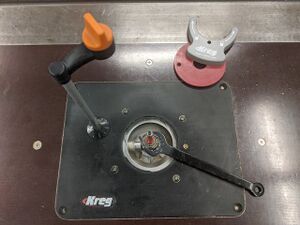
Then, remove the red protective plate, unlocking it with the grey plastic tool.
Then, using the crank, raise the bit to its highest position. Turning the chuck, you should hear a click when the spindle lock engages.
Once in this position, unlock the bit using the black flat wrench. If the new bit has a shank of a different size, unscrew the chuck completely and replace it with one the proper size.
Place the new bit, tighten it with the wrench, lower it, and place back the red protective plate (using the smallest hole that would fit over the bit).
Put away the tools, flip the switch back on, and you’re good to go!
Förbrukningsmaterial
Underhåll och reservdelar
Underhåll
- Daily
- Monthly
Reservdelar
We do not have spare parts for this machine.
Logg
Länkar
Ägare
Maskinen inköpt av Makerspace
